
Implementing UFS Journaling on a Desktop PC
trademarks
FreeBSD is a registered trademark of the FreeBSD Foundation.
Many of the designations used by manufacturers and sellers to distinguish their products are claimed as trademarks. Where those designations appear in this document, and the FreeBSD Project was aware of the trademark claim, the designations have been followed by the “™” or the “®” symbol.
Table of Contents
Abstract
A journaling file system uses a log to record all transactions that take place in the file system, and preserves its integrity in the event of a system crash or power failure. Although it is still possible to lose unsaved changes to files, journaling almost completely eliminates the possibility of file system corruption caused by an unclean shutdown. It also shortens to a minimum the time required for after-failure file system checking. Although the UFS file system employed by FreeBSD does not implement journaling itself, the new journal class of the GEOM framework in FreeBSD 7.X can be used to provide file system independent journaling. This article explains how to implement UFS journaling on a typical desktop PC scenario.
1. Introduction
While professional servers are usually well protected from unforeseen shutdowns, the typical desktop is at the mercy of power failures, accidental resets, and other user related incidents that can lead to unclean shutdowns. Soft Updates usually protect the file system efficiently in such cases, although most of the times a lengthy background check is required. On rare occasions, file system corruption reaches a point where user intervention is required and data may be lost.
The new journaling capability provided by GEOM can greatly assist in such scenarios, by virtually eliminating the time required for file system checking, and ensuring that the file system is quickly restored to a consistent state.
This article describes a procedure for implementing UFS journaling on a typical desktop PC scenario (one hard disk used for both operating system and data). It should be followed during a fresh installation of FreeBSD. The steps are simple enough and do not require overly complex interaction with the command line.
After reading this article, you will know:
How to reserve space for journaling during a new installation of FreeBSD.
How to load and enable the
geom_journalmodule (or build support for it in your custom kernel).How to convert your existing file systems to utilize journaling, and what options to use in /etc/fstab to mount them.
How to implement journaling in new (empty) partitions.
How to troubleshoot common problems associated with journaling.
Before reading this article, you should be able to:
Understand basic UNIX® and FreeBSD concepts.
Be familiar with the installation procedure of FreeBSD and the sysinstall utility.
The procedure described here is intended for preparing a new installation where no actual user data is stored on the disk yet. While it is possible to modify and extend this procedure for systems already in production, you should backup all important data before doing so. Messing around with disks and partitions at a low level can lead to fatal mistakes and data loss. |
2. Understanding Journaling in FreeBSD
The journaling provided by GEOM in FreeBSD 7.X is not file system specific (unlike for example the ext3 file system in Linux®) but is functioning at the block level. Though this means it can be applied to different file systems, for FreeBSD 7.0-RELEASE, it can only be used on UFS2.
This functionality is provided by loading the geom_journal.ko module into the kernel (or building it into a custom kernel) and using the gjournal command to configure the file systems.
In general, you would like to journal large file systems, like /usr.
You will need however (see the following section) to reserve some free disk space.
When a file system is journaled, some disk space is needed to keep the journal itself.
The disk space that holds the actual data is referred to as the data provider, while the one that holds the journal is referred to as the journal provider.
The data and journal providers need to be on different partitions when journaling an existing (non-empty) partition.
When journaling a new partition, you have the option to use a single provider for both data and journal.
In any case, the gjournal command combines both providers to create the final journaled file system.
For example:
You wish to journal your /usr file system, stored in /dev/ad0s1f (which already contains data).
You reserved some free disk space in a partition in /dev/ad0s1g.
Using
gjournal, a new /dev/ad0s1f.journal device is created where /dev/ad0s1f is the data provider, and /dev/ad0s1g is the journal provider. This new device is then used for all subsequent file operations.
The amount of disk space you need to reserve for the journal provider depends on the usage load of the file system and not on the size of the data provider. For example on a typical office desktop, a 1 GB journal provider for the /usr file system will suffice, while a machine that deals with heavy disk I/O (i.e. video editing) may need more. A kernel panic will occur if the journal space is exhausted before it has a chance to be committed.
The journal sizes suggested here, are highly unlikely to cause problems in typical desktop use (such as web browsing, word processing and playback of media files). If your workload includes intense disk activity, use the following rule for maximum reliability: Your RAM size should fit in 30% of the journal provider’s space. For example, if your system has 1 GB RAM, create an approximately 3.3 GB journal provider. (Multiply your RAM size with 3.3 to obtain the size of the journal). |
For more information about journaling, please read the manual page of gjournal(8).
3. Steps During the Installation of FreeBSD
3.1. Reserving Space for Journaling
A typical desktop machine usually has one hard disk that stores both the OS and user data. Arguably, the default partitioning scheme selected by sysinstall is more or less suitable: A desktop machine does not need a large /var partition, while /usr is allocated the bulk of the disk space, since user data and a lot of packages are installed into its subdirectories.
The default partitioning (the one obtained by pressing A at the FreeBSD partition editor, called Disklabel) does not leave any unallocated space. Each partition that will be journaled, requires another partition for the journal. Since the /usr partition is the largest, it makes sense to shrink this partition slightly, to obtain the space required for journaling.
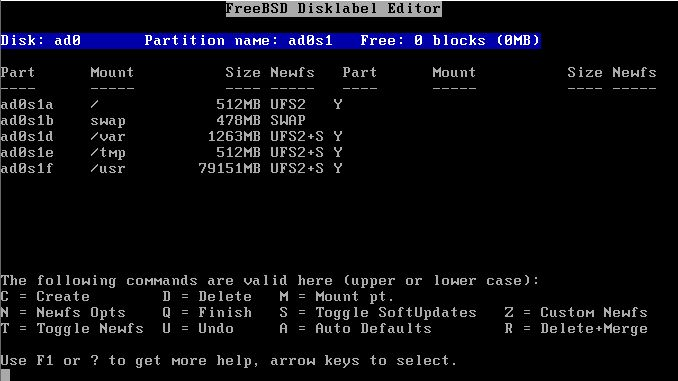
In our example, an 80 GB disk is used. The following screenshot shows the default partitions created by Disklabel during installation:
If this is more or less what you need, it is very easy to adjust for journaling. Simply use the arrow keys to move the highlight to the /usr partition and press D to delete it.
Now, move the highlight to the disk name at the top of the screen and press C to create a new partition for /usr. This new partition should be smaller by 1 GB (if you intend to journal /usr only), or 2 GB (if you intend to journal both /usr and /var). From the pop-up that appears, opt to create a file system, and type /usr as the mount point.
Should you journal the /var partition? Normally, journaling makes sense on quite large partitions. You may decide not to journal /var, although doing so on a typical desktop will cause no harm. If the file system is lightly used (quite probable for a desktop) you may wish to allocate less disk space for its journal. In our example, we journal both /usr and /var. You may of course adjust the procedure to your own needs. |
To keep things as easy going as possible, we are going to use sysinstall to create the partitions required for journaling. However, during installation, sysinstall insists on asking a mount point for each partition you create. At this point, you do not have any mount points for the partitions that will hold the journals, and in reality you do not even need them. These are not partitions that we are ever going to mount somewhere.
To avoid these problems with sysinstall, we are going to create the journal partitions as swap space. Swap is never mounted, and sysinstall has no problem creating as many swap partitions as needed. After the first reboot, /etc/fstab will have to be edited, and the extra swap space entries removed.
To create the swap, again use the arrow keys to move the highlight to the top of Disklabel screen, so that the disk name itself is highlighted. Then press N, enter the desired size (1024M), and select "swap space" from the pop-up menu that appears. Repeat for every journal you wish to create. In our example, we create two partitions to provide for the journals of /usr and /var. The final result is shown in the following screenshot:
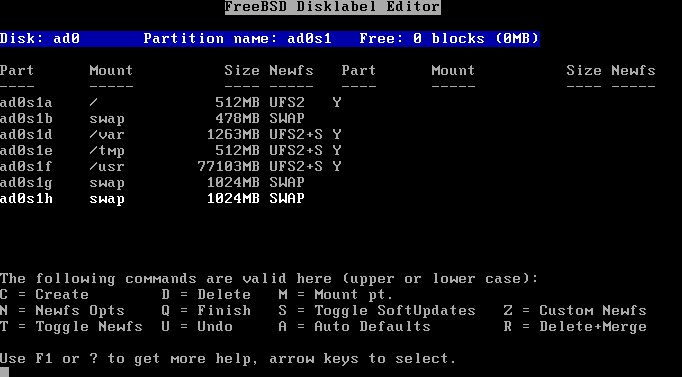
When you have completed creating the partitions, we suggest you write down the partition names, and mount points, so you can easily refer to this information during the configuration phase. This will help alleviate mistakes that may damage your installation. The following table shows our notes for the sample configuration:
| Partition | Mount Point | Journal |
|---|---|---|
ad0s1d | /var | ad0s1h |
ad0s1f | /usr | ad0s1g |
Continue the installation as you would normally do. We would however suggest you postpone installation of third party software (packages) until you have completely setup journaling.
3.2. Booting for the first time
Your system will come up normally, but you will need to edit /etc/fstab and remove the extra swap partitions you created for the journals. Normally, the swap partition you will actually use is the one with the "b" suffix (i.e. ad0s1b in our example). Remove all other swap space entries and reboot so that FreeBSD will stop using them.
When the system comes up again, we will be ready to configure journaling.
4. Setting Up Journaling
4.1. Executing gjournal
Having prepared all the required partitions, it is quite easy to configure journaling.
We will need to switch to single user mode, so login as root and type:
# shutdown nowPress Enter to get the default shell. We will need to unmount the partitions that will be journaled, in our example /usr and /var:
# umount /usr /varLoad the module required for journaling:
# gjournal loadNow, use your notes to determine which partition will be used for each journal. In our example, /usr is ad0s1f and its journal will be ad0s1g, while /var is ad0s1d and will be journaled to ad0s1h. The following commands are required:
# gjournal label ad0s1f ad0s1g
GEOM_JOURNAL: Journal 2948326772: ad0s1f contains data.
GEOM_JOURNAL: Journal 2948326772: ad0s1g contains journal.

# gjournal label ad0s1d ad0s1h
GEOM_JOURNAL: Journal 3193218002: ad0s1d contains data.
GEOM_JOURNAL: Journal 3193218002: ad0s1h contains journal.
If the last sector of either partition is used, Since this is a new installation, it is highly unlikely that anything will be actually overwritten. |
At this point, two new devices are created, namely ad0s1d.journal and ad0s1f.journal. These represent the /var and /usr partitions we have to mount. Before mounting, we must however set the journal flag on them and clear the Soft Updates flag:
# tunefs -J enable -n disable ad0s1d.journal
tunefs: gjournal set
tunefs: soft updates cleared

# tunefs -J enable -n disable ad0s1f.journal
tunefs: gjournal set
tunefs: soft updates cleared
Now, mount the new devices manually at their respective places (note that we can now use the async mount option):
# mount -o async /dev/ad0s1d.journal /var
# mount -o async /dev/ad0s1f.journal /usr
Edit /etc/fstab and update the entries for /usr and /var:
/dev/ad0s1f.journal     /usr            ufs     rw,async      2       2
/dev/ad0s1d.journal     /var            ufs     rw,async      2       2
Make sure the above entries are correct, or you will have trouble starting up normally after you reboot! |
Finally, edit /boot/loader.conf and add the following line so the gjournal(8) module is loaded at every boot:
geom_journal_load="YES"
Congratulations! Your system is now set for journaling.
You can either type exit to return to multi-user mode, or reboot to test your configuration (recommended).
During the boot you will see messages like the following:
ad0: 76293MB XEC XE800JD-00HBC0 08.02D08 at ata0-master SATA150
GEOM_JOURNAL: Journal 2948326772: ad0s1g contains journal.
GEOM_JOURNAL: Journal 3193218002: ad0s1h contains journal.
GEOM_JOURNAL: Journal 3193218002: ad0s1d contains data.
GEOM_JOURNAL: Journal ad0s1d clean.
GEOM_JOURNAL: Journal 2948326772: ad0s1f contains data.
GEOM_JOURNAL: Journal ad0s1f clean.
After an unclean shutdown, the messages will vary slightly, i.e.:
GEOM_JOURNAL: Journal ad0s1d consistent.This usually means that gjournal(8) used the information in the journal provider to return the file system to a consistent state.
4.2. Journaling Newly Created Partitions
While the above procedure is necessary for journaling partitions that already contain data, journaling an empty partition is somewhat easier, since both the data and the journal provider can be stored in the same partition. For example, assume a new disk was installed, and a new partition /dev/ad1s1d was created. Creating the journal would be as simple as:
# gjournal label ad1s1dThe journal size will be 1 GB by default.
You may adjust it by using the -s option.
The value can be given in bytes, or appended by K, M or G to denote Kilobytes, Megabytes or Gigabytes respectively.
Note that gjournal will not allow you to create unsuitably small journal sizes.
For example, to create a 2 GB journal, you could use the following command:
# gjournal label -s 2G ad1s1dYou can then create a file system on your new partition, and enable journaling using the -J option:
# newfs -J /dev/ad1s1d.journal4.3. Building Journaling into Your Custom Kernel
If you do not wish to load geom_journal as a module, you can build its functions right into your kernel.
Edit your custom kernel configuration file, and make sure it includes these two lines:
options UFS_GJOURNAL # Note: This is already in GENERIC

options GEOM_JOURNAL # You will have to add this one
Rebuild and reinstall your kernel following the relevant instructions in the FreeBSD Handbook.
Do not forget to remove the relevant "load" entry from /boot/loader.conf if you have previously used it.
5. Troubleshooting Journaling
The following section covers frequently asked questions regarding problems related to journaling.
5.1. I am getting kernel panics during periods of high disk activity. How is this related to journaling?
The journal probably fills up before it has a chance to get committed (flushed) to disk. Keep in mind the size of the journal depends on the usage load, and not the size of the data provider. If your disk activity is high, you need a larger partition for the journal. See the note in the Understanding Journaling in FreeBSD section.
5.2. I made some mistake during configuration, and I cannot boot normally now. Can this be fixed some way?
You either forgot (or misspelled) the entry in /boot/loader.conf, or there are errors in your /etc/fstab file. These are usually easy to fix. Press Enter to get to the default single user shell. Then locate the root of the problem:
# cat /boot/loader.confIf the geom_journal_load entry is missing or misspelled, the journaled devices are never created.
Load the module manually, mount all partitions, and continue with multi-user boot:
# gjournal load

GEOM_JOURNAL: Journal 2948326772: ad0s1g contains journal.
GEOM_JOURNAL: Journal 3193218002: ad0s1h contains journal.
GEOM_JOURNAL: Journal 3193218002: ad0s1d contains data.
GEOM_JOURNAL: Journal ad0s1d clean.
GEOM_JOURNAL: Journal 2948326772: ad0s1f contains data.
GEOM_JOURNAL: Journal ad0s1f clean.

# mount -a
# exit
(boot continues)
If, on the other hand, this entry is correct, have a look at /etc/fstab. You will probably find a misspelled or missing entry. In this case, mount all remaining partitions by hand and continue with the multi-user boot.
5.3. Can I remove journaling and return to my standard file system with Soft Updates?
Sure. Use the following procedure, which reverses the changes. The partitions you created for the journal providers can then be used for other purposes, if you so wish.
Login as root and switch to single user mode:
# shutdown nowUnmount the journaled partitions:
# umount /usr /varSynchronize the journals:
# gjournal syncStop the journaling providers:
# gjournal stop ad0s1d.journal
# gjournal stop ad0s1f.journal
Clear journaling metadata from all the devices used:
# gjournal clear ad0s1d
# gjournal clear ad0s1f
# gjournal clear ad0s1g
# gjournal clear ad0s1h
Clear the file system journaling flag, and restore the Soft Updates flag:
# tunefs -J disable -n enable ad0s1d
tunefs: gjournal cleared
tunefs: soft updates set

# tunefs -J disable -n enable ad0s1f
tunefs: gjournal cleared
tunefs: soft updates set
Remount the old devices by hand:
# mount -o rw /dev/ad0s1d /var
# mount -o rw /dev/ad0s1f /usr
Edit /etc/fstab and restore it to its original state:
/dev/ad0s1f     /usr            ufs     rw      2       2
/dev/ad0s1d     /var            ufs     rw      2       2
Finally, edit /boot/loader.conf, remove the entry that loads the geom_journal module and reboot.
6. Further Reading
Journaling is a fairly new feature of FreeBSD, and as such, it is not very well documented yet. You may however find the following additional references useful:
A new section on journaling is now part of the FreeBSD Handbook.
This post in FreeBSD-CURRENT mailing list by gjournal(8)'s developer,
Paweł Jakub Dawidek <pjd@FreeBSD.org>.This post in FreeBSD general questions mailing list by
Ivan Voras <ivoras@FreeBSD.org>.The manual pages of gjournal(8) and geom(8).
Last modified on: November 3, 2021 by Sergio Carlavilla Delgado